Thursday, November 1, 2012

Vitamin D for Portlanders

 If you live in Portland, Oregon, or another location devoid of sunshine for many months at a time, you may want to think about the amount of Vitamin D your body needs to stay healthy.
Vitamin D is a fat soluble vitamin whose major role is to aid in absorption of calcium and phosphorus from the intestine and build and maintain bone mass. Beyond its function in calcium metabolism, it also has a role in reducing inflammation, preventing malignant cell growth, moderating immune function, and leveling mood. 


Last Winter, I couldn't shake a cough I had and was feeling really tired. I had a blood test to verify my Vitamin D levels and found they were insufficient. Not devastatingly deficient but lower than they should be.  My doctor suggested (until the sun came out again) taking a Vitamin D3 supplement (1000 IU) per day along with my multivitamin (400 IU) and eating foods fortified with D. (Please consult a doctor to see what is right for you.)

Over the past few years, research has shown that getting enough vitamin D can reduce the risk of several medical conditions, including osteoporosis, gum disease, diabetes, arthritis, multiple sclerosis and YES, even certain cancers.

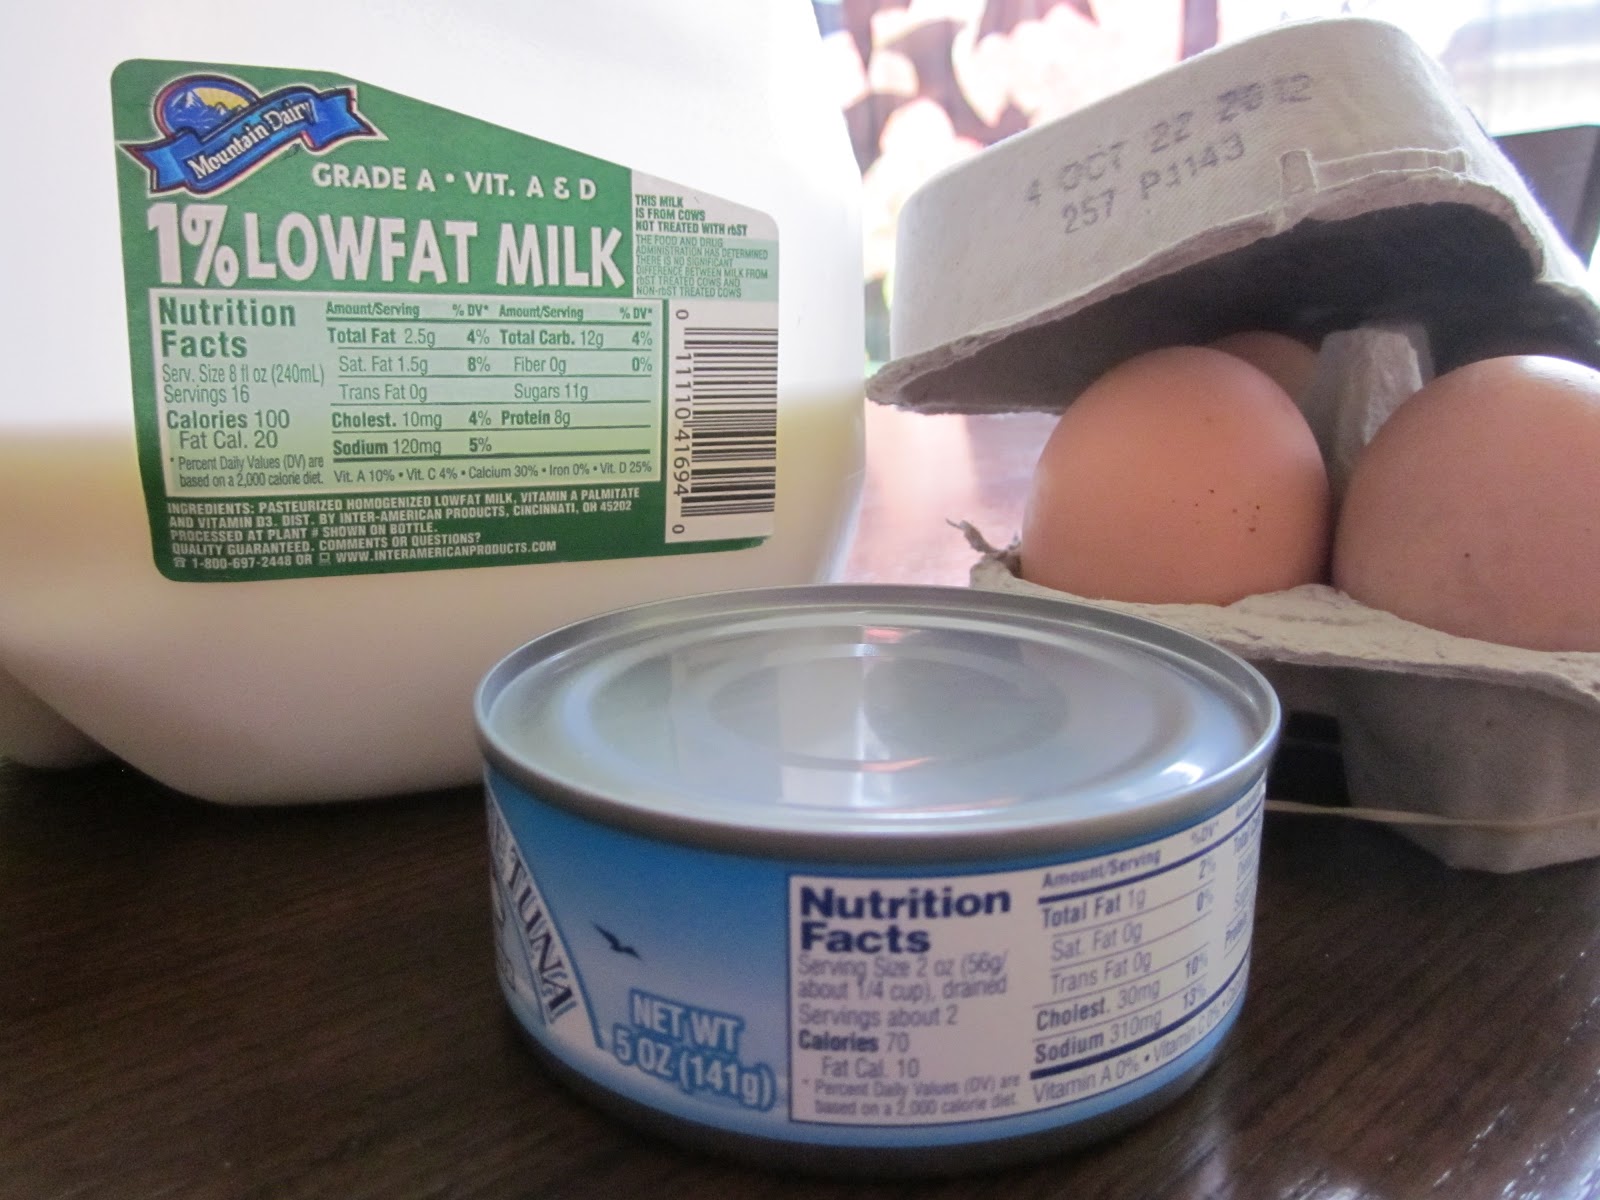
The human body produces Vitamin D when sunlight hits your skin. According to experts, sun exposure without sunscreen for about 15 minutes is the best way to insure healthy Vitamin D levels for many people. For people who are dark skinned, over 50, or are overweight may have a harder time generating D through the sun's rays may need additional exposure or supplements.  Eating foods like salmon, mackerel, shitake mushrooms, canned tuna, cheese, egg yolks and Vitamin D fortified milk are recommended Vitamin D food sources.  I wasn't sure what fortified really meant when it came to vitamins, so I did a little reading and found some interesting information you may want to consider:
Fortified means that a nutrient has been added to the food because during manufacturing it was removed, or it was never naturally present. They tend to be isolated nutrients that studies have been shown are deficient in our diet ie. iron...Furthermore, foods are fortified using the cheapest form of a nutrient that your body cannot even absorb. Remember, it’s to sell the product, not to make you healthy. Calcium and vitamin D are great examples of this.
http://www.joyoushealth.ca/2010/08/18/food-claims-what-does-fortified-enriched-really-mean/
Young or old, thick or thin, light or dark; if you live in Portland you may want to think about how to maintain healthy levels of Vitamin D in your body!

http://www.hsph.harvard.edu/nutritionsource/questions/vitamin-d-and-chronic-disease/
http://menopause.about.com/od/postmenopausehealthrisks/a/Daily-VitD-Meno.htm
www.health.com/health/gallery/0,,20504538,00.html
today.msnbc.msn.com/.../ways-get-more-vitamin-d 

Wednesday, October 31, 2012

Roast Chicken & Stock; the 2 for 1 Deal


Roast chicken and vegetables
 I call this the 2 for 1 deal because in order to make chicken stock one needs to cook a chicken. Why not have a fine dinner, leftovers for sandwiches, then use the carcass to make yet another wholesome thing to consume (stock.) This may seem like a lot of work, and it does take time. However, your efforts will produce a lot of healthy food, using little money and producing almost no waste.

Chicken Stock

When one makes chicken stock you get your moneys worth on the chicken purchased ( a whole chicken is $4 to $8), the vegetable used in making stock are dirt cheap (you will probably use $1-$2 worth of vegetables.)  Less waste for the environment, especially when you compost and no stock cartons or cans to the landfill.

Homemade stock not only has excellent taste, without the 570mg of sodium per cup of some store bought stock. Even the low sodium varieties have (in my opinion) a lot of sodium (430mg per cup).
The American Heart Association recommends eating less than 1500 mg of sodium a day. This may seem like a lot, but take a look at the national daily consumption in the United States - 3,436 mg. As for the minimum, which is about 500 mg per day, it is rare to go below that as long as you're on a balanced diet. http://voices.yahoo.com/how-much-sodium-per-day-good-7761328.html?cat=5
Broths made from bones not only sooth on a cold day but are proven to heal.
Bone broths (meat, chicken and fish) have been around since the beginning of time I’m certain.  Traditional cultures intuitively knew that animal bones have great healing properties.  Even today it is proven that the fat of chicken broth/soup is like penicillin in helping to heal the flu and such.  More importantly is how healing bone broths are to the lining of our digestive tract in the form of amino acids.  Broth is a rich source of minerals, vitamins, calcium and gelatin which is very strengthening to our bones…as you well know. http://www.chefshanekelly.com/2011/04/bone-broths-heal/
The BEST thing about making chicken stock is that before you start: ONE MUST, make and eat a delicious, inexpensive chicken dinner, and usually leftovers.

Delicious, Inexpensive, and EASY Roast Chicken
Ingredients
1 whole chicken (any size) insides removed
1 lemon
1/4 cup olive oil
1 tbl dried thyme
salt and pepper
kitchen twine
Add veggies to complete the meal: (optional)
Small potatoes
1small thick chopped onion,
 1/2 cup each celery and carrot
 1 1/2 -2 cups chicken stock (if adding veggies)

Method
Pre-Heat oven to 425F
  1. Rinse the chicken off with warm water, add the olive oil so it coats all of the skin.
  2. Cut the lemon in half and put one half inside the chicken cavity. Then tie the legs together with twine. (this will trap moisture)
  3. Liberally add salt and fresh pepper to the entire chicken. Sprinkle the thyme on the skin as well.
  4. Put the veggies (optional) in the bottom of a roasting pan or dutch oven( I use a dutch oven), sprinkle with salt and pepper
  5. Place the chicken directly on top of the veggies. place the lid on the pan or dutch oven.
  6. Cook in the oven for 1 hour
  7. After an hour, take the lid off.
  8. Add stock to the pan if you added veggies
  9. Drizzle the bird with lemon juice then a bit more olive oil to insure brown skin
  10. Cook uncovered for 30 more minutes.
AFTER, one has enjoyed the roast chicken and the carcass has been relieved of as much meat as possible, it’s time to make stock.
  
My stock pot
 Chicken Stock Recipe
Yields will vary but you should be able to get at least 10 cups of stock
Mesh strainer & paper towel
  1. Place the carcass in a large pot, (I use a pot with a built in colander) and fill it with just enough water to submerge the carcass.
  2. Add about 10 whole black peppercorns
  3. 1 bay leaf
  4. Any coarse chopped root vegetables: I use celery (especially the tops), carrot, garlic and onion. 
  5. Bring to a boil
  6. Set to simmer, lid on for 4-6 hours (barely simmer, you should see one or two bubbles at a time)
  7. Discard everything except the liquid.
  8. Strain the liquid into a large container or bowl. I put a paper towel or cheese cloth over a metal mesh strainer and drain through that.
  9. Let the stock cool uncovered in the refrigerator, fat will rise to the top and form a protective barrier making it safe from bacteria.
  10. Discard fat and place stock in containers for storage. I use mason jars or small and large ziplock freezer bags so I can store/freeze different quantities. Thawing out stock in a sealed freezer bag takes no time at all when submerged in a bowl of warm water.
I use chicken stock all the time for different recipes; cooking rice, soups, sauces, risotto, couscous, etc. I have bought just about every kind and form of chicken stock from bullion cube, low sodium, can, carton, fat free, and they all served their purpose but non of the latter compare with the flavorful wholesome goodness of homemade chicken stock.


Monday, October 29, 2012

Winter Crop Covers; Cloche & Cold Frames


             Outside today is my favorite kind of autumn weather, warm sun, a few clouds and a refreshing breeze.  Quite a switch from Portland, Oregon’s weekend weather, when it felt like Winter.  It was stormy, if one didn’t know better one would have thought that hurricane Sandy had redirected itself westward, the rain and wind were merciless.  It also felt like winter because it was the farmer’s markets last open weekend of the season, reminding me that it’s time to prepare my garden for a change in season.

Good bye, until Spring, farmer's market favorites
I can’t complain, we had a mostly sunny October with almost no rain, one of the driest months on record for usda Gardening zone 8b. It has felt really cold to me at night here lately, I panicked a little when I thought it may have gotten down below freezing already; I have woken up plenty of mornings in October to see the thermometer at about 40 degrees F. I was relieved to find that the first frost for Portland hadn’t come yet, and on average the doesn’t come until November 21-30th– (http://www.plantmaps.com/interactive-oregon-first-frost-date-map.php)
                                                     
Some plants growing in my backyard over the winter will need to be covered for protection from frost, possibly snow and heavy rain. I don’t have a lot of experience covering plants, in the past years I have only covered strawberries and used the hay like mesh recycled from the bottom of a wire hanging plant basket, this worked well as a filter for rain. In addition to the strawberries, I have onion sets, garlic cloves, and leaf lettuce I need to cover.  Fortunately, one can get very elaborate or stay basic when it comes to covering plants. I did some research and found some methods that I plan on trying out.

Cloche
The Original cloche was a glass bell shaped jar placed over delicate plants to protect from harsh elements, especially at night. Although, lettuce can be tough I will plan on protecting and extending my lettuce crops with a modern, less elegant version of the original, the plastic milk jug cloche (cut the bottom off.)

Cold Frame
A cold frame is a protected plant bed ( it can be made portable and placed over different crops). Cold frames rely on the heat from the sun alone for warmth. It is usually only 5-10 degrees warmer in a cold frame than the outdoor temperature, but these few degrees still help, along with shelter from  harsh wind and rain that a cold frame provides. Common materials used for cold frames are: wood, plastic, fiber glass, and glass. 
I’m not much of a carpenter, so I was thinking of a way I could use the raised beds that I plant in as a frame. Then stretch plastic across the raised be and secure it with nails on one side then a less permanent seal for another side providing access to the bed and plants.  um yeah...well...I have a couple of weeks yet to plan it out.

Let me know what you do to protect your crops from the cold.

Find out the average date for the first frost in your area;

For more info on Cold Frames, Cloches, and Winter Garden care:
http://www.vegetablegardener.com/item/2504/cold-frame-gardening/page/all


Friday, October 26, 2012

Halloween Traditions


With Halloween just a few days away and more holidays soon to follow; I've been thinking about activities I have engaged in during this time of year in the past that have been memorable and special enough to make into a yearly tradition.The following are memories that I am anxious to relive; decorating my house, visiting a local pumpkin patch, and carving pumpkins.

Last week I decorated for Halloween. Nothing major, not the kind of decorations people drive by to see, mostly inside the house. John has a huge bin of Halloween decorations he has collected over the years, all of which come out when he has hosted a Halloween party in the past. We are not having a Halloween party this year. So,only the decorations that I like came down from the attic. The other decorations; the screaming mechanical ghouls, light up vampire bats, and life size bloody clown figures are not adorning our doorways or hiding in the downstairs bathroom shower stall this year. Decorating the house made me excited for the holidays; I love the way they made the house look like a different place. It's funny how the placement of a few new colorful objects will do that to an interior.

In the past, John and I have visited one of the "Pumpkin Patches" on Sauvie Island to buy the pumpkins we carve for Halloween. There are a couple Pumpkin Patch farms on the island, usually crowded with families in rubber rain boots stomping happily through the mud to see the barn that houses a market, apple cider and kettle corn stands, hay rides, farm animals, and of course pumpkins of every shape and size imaginable for sale. Sauvie Island is a thirty minute drive from our house in NE Portland, Oregon. There are certainly closer places to buy pumpkins but it's fun to get out of town and do something unnecessary just for kicks. Besides we still talk about memories like: the giant sow who almost busted through her pen when she saw someone eating an apple nearby, and Hercules, the furry miniature horse I fell in love with.

We didn't carve pumpkins last year, I can't remember why, things got busy or maybe we got the pumpkins too early and they started to rot. It wasn't until after Halloween that realized we hadn't done it and was disappointed.  I wanted to have my memories reinforced by repeating them. Memories like: being amazed at John's precision and speed (he is the best pumpkin carver I have ever seen,)being  proud of the pirate ship and monster pumpkin we expertly created, and showcasing on the porch with illuminating candles.

What are your Halloween traditions?


Thursday, October 25, 2012

My Favorite Salad Dressing Recipes


Homemade salad dressing is easy to make, tastes great, and I 'll bet you already have the ingredients you need to make it in your kitchen right now.

Does this stuff look familiar?

When I started getting interested in cooking it was to save money and eat healthier.


I began asking myself questions like:

Q: What kinds of food did I buy a lot of?
A: Salad Dressing (was one item)

Q: Could I make a less expensive, healthier version of what I was buying from scratch?
A: YES

The first time I tasted salad dressing that I made at home I thought I had died and gone to heaven. I couldn’t believe that something I mixed together in about two minutes from ingredients I always had on hand could be so tasty, inexpensive, and healthy.
The best thing about making your own dressing is that one can customize the recipe to fit individual diets and tastes.  Homemade dressing doesn’t have the fillers or preservatives that store bought ones do so they have a lot more flavor. More flavorful dressing means one has to add less dressing and calories to a salad to enjoy it!

My 2 Favorite Salad Dressing Recipes (Balsamic Vinaigrette and Greek Dressing)
Prep Time: About 2 minutes or less
Yield: 1 cup of dressing

1. Mix ingredients in any small container with a secure lid (I use plastic food storage tubs or mason jars.)
2. Secure the lid then shake vigorously.
3. ENJOY

BALSAMIC VINAIGRETTE
½ cup olive oil
½ cup balsamic vinegar
1.5 Tbl brown mustard
½ tsp sea salt
1 tsp fresh ground black pepper

GREEK DRESSING
½ cup olive oil
½ cup red wine vinegar
1 Tbl minced garlic
1.5 Tbl brown mustard
½ tsp dried oregano
½ tsp sea salt
1 tsp fresh ground black pepper


Wednesday, October 24, 2012

Israeli Couscous; So Many Possibilities!

Israeli Couscous makes a great side dish as an alternative to rice or other pasta and can be made into a hearty main dish when protein is added. So many possibilities! What will you add to yours?


Mediterranean Style Couscous
        Every time I talk to my mom on the phone about making food she asks me "Have I told you my Israeli Couscous recipe?"

I say "Yes" and she proceeds to tell me the ingredients: Soaked cranberries, olive oil,...then how much my sister, Kara loves it (Kara was a picky eater as a kid) there fore in my mom's eyes it must be really good if Kara likes it.

My Mom's Sweeter Moroccan Style Couscous is good, but lately I've had a taste for the savory flavors of the Mediterranean; feta cheese and Kalamata olives...

I served the following dish to my Book Club the other night and it was a big hit.

Israeli Couscous looks like little balls or pearls (buy it in the dried bulk section of your local grocery store.)

1. Cook the couscous like you would pasta:
Boil 2 cups of water or broth
1 tsp olive oil, dash of salt (optional)
Stir in 1 cup dried Israeli Couscous
Cook 8-10 minutes until tender
Drain and cool to room temperature

2. Gently stir in the following Ingredients:
1-2 Table spoon red wine vinegar
1-2 Table spoon olive oil
sea salt and pepper to taste
About a 1/4 cup each chopped:
Sun dried or fresh tom
crumbled feta cheese
parsley
chives

Kalamata olives  

Or, instead of the ingredients above stir in the following ingredients my mom likes to use:
1/2 cup dried cranberries (soaked in water overnight)
1/4 cup olive oil
2 Tbl lemon juice
1 Tbl spoon minced garlic
1/4 cup chopped scallions

3. Serve immediately or let it chill then serve, it is good either way.


What will you add to your Israeli Couscous?


Tuesday, October 23, 2012

Carnival Squash; A Happy Accident

Baked it with brown sugar
Harlequin or Carnival Squash
Squash can brighten the room when arranged as a center piece.

                I bought what I thought was a Acorn squash plant start (that's what the tag said) from my local Farmer's Market here in Portland, OR(usda Gardening Zone 8b.) What I ended up growing was a relative of Acorn squash known as Harlequin or Carnival squash (I guess the tags got switched.)The squash is the size and shape as it's cousin Acorn but the skin is yellow streaked with bright orange and green, it makes a great addition to ones fall menu or decor.

I planted this Harlequin squash start in June and it quickly grew to an enormous plant with huge fan like leaves. The squash were ready by mid August. In my opinion,this plant produced a perfect amount (yielded about 15 squash) without getting crazy like zucchini and other squash varieties.

Harlequin squash has a milder flavor and a grainier texture than Acorn but it is just as versatile and can be prepared with the same recipes you use for other squash like Butternut or Acorn.

For example, I made my favorite soup recipe substituting Harlequin for Butternut.

Butternut Squash Apple Soup Recipe 
http://www.simplyrecipes.com/recipes/butternut_squash_apple_soup/

I also baked the squash the same way I prepare Acorn squash with butter, brown sugar, and maple syrup. 
http://www.simplyrecipes.com/recipes/classic_baked_acorn_squash/

Classic Baked Acorn Squash Recipe
  • Prep time: 10 minutes
  • Cook time: 1 hour, 15 minutes

Ingredients

  • 1 Acorn squash
  • 1 Tbsp Butter
  • 2 Tbsp Brown Sugar
  • 2 teaspoons Maple Syrup
  • Dash of Salt

Method 

1 Preheat oven to 400°F.
2 Using a strong chef's knife, and perhaps a rubber mallet to help, cut the acorn squash in half, lengthwise, from stem to end. Use a spoon to scoop out the seeds and stringy stuff in the center of each half. Score the insides of each half several times with a sharp knife. Place each half in a baking pan, cut side up. Add about a 1/4 inch of water to the bottom of the baking pan so that the skins don't burn and the squash doesn't get dried out.
3 Coat the inside of each half with 1/2 a Tbsp of butter. Add a dash of salt if you are using unsalted butter. Add a Tbsp of brown sugar to the cavity of each half. Dribble on a teaspoon of maple syrup to each half.
4 Bake in the oven for 1 hour to 1 hour 15 minutes, until the squash is very soft and the tops are browned. Do not undercook. When finished, remove from oven and let cool a little before serving. Spoon any buttery sugar sauce that has not already been absorbed by the squash over the exposed areas.
Yield: Serves 2 to 4, depending on how much squash you like to eat.


Happy accidents in your life lately? I would love to hear about them!